Sunday, March 28, 2010

Landscaping 101

I have done a little landscaping in the front yard over the past month.  All of this began with a suggestion from my mom that we prune the overgrown rose bush in the front yard during a recent visit.

After the bush was pruned we thought it might be nice to remove the grass from around the base of the rose bush and add a little mulch.  Then I decided I wanted to use the process of "sheet mulching" to reduce the amount of lawn in the front yard and add some visual interest beyond the one ailing rose bush awkwardly growing against the chain-linked fence. 

You might ask, "What is sheet mulching?"  I recently attended a presentation put on by a Seattle Tilth representative and she introduced me to the concept.  If you have an area of your yard that is grass but you want it to be a planted bed instead, you can cover it with cardboard or several layers of newspaper (not the shinly ads but normal newsprint) and then spread mulch over the top.  The cardboard and newspaper will prevent the grass from growing up under the mulch and the grass will eventually die and decompose, as will the newspaper and cardboard and it will all contribute to a nutrient rich soil for your plants!

Luckily we had recently had some stumps ground in the front and back yards so I had a large pile of mulch!  This started a few weekends ago and finished up yesterday.  The pictures just do not do it justice.  Yet another reason to come visit in person.


This sad looking rose bush was very overgrown.  We think it is a climber and I contemplated buying a trellis but it seems very sick so may come out if it doesn't recover this year. Keep your fingers crossed and let me know if you have any tips for sick roses!


Sheet Mulching Process...


Ta Da!
Front row: black eyed susans, dinosaur plant (name we made up because I don't remember the name), white heathers, clematis (on the bamboo stick) ; Middle row: succulents in stone, rosemary, lavender; Back row: purple irises, purple hebe bush. Not pictured: wildflower seeds that are just starting to push out of the ground.

Alpine strawberry (in pot), marionberry canebush (this one will spread like crazy), white heather, cranberry bush.

 Now for that lawn....

Sourdough Starter

I have tried making bread myself a few times but I've discovered the Essential Bakery and Dhalia Bakery and breadmaking suddenly seemed like too much work.

I have used one recipe several times from the column "The Minimalist" in the New York Times.  It is for a bread that requires very little kneading and very little rising time.  (Follow this link for the recipe.)  The "no-knead" bread was great because it is less labor intensive but it can be somewhat dense. I have read two books recently that sing the praises of of home-baked bread and I found my interest in the process is renewed. 

I was intrigued by the idea of the Sourdough starter. Basically, which involves growing your own yeast instead of using yeast from little paper packets.  In the breadmaking world the yeast in those paper packets is called "commercial yeast."  A sourdough starter is made from flour and water that sit for about a week and have flour and water added on a daily basis.  The flour and the air have "wild yeasts" and together they make a unique yeast that is more flavorful and better for you than the commercial yeast.

If you run a google search for "sourdough starter" you will find a lot of recipes, tips, and instructions.  You may find that you have to adapt a few to comes up with something that works for you.  I found easy-to-follow instructions in one of my Spring books: Urban Homestead.

We are about 5 days into it and so far, so good.  I'll make sure to post a picture of the results if I can get one before we gooble it up!

UPDATE: 04/21

My previous starter failed so I've done some research and I'm starting a new starter.  Some tips I found:

* The other recipes I found said to leave the jar uncovered
* A wooden spoon should be used to stir (never metal!)
* The starter needs to be warm! 

I've put it on our fireplace mantle and I'm hoping the pilot light and a kitchen towel cozy will keep it going.  Any other tips are welcome!


Sunday, March 21, 2010

Terrarium Class and the RE Store

Before the trek to the Seattle Tilth Edible Plant Sale I attended "Creative Terrariums" Class at the RE Store in Ballard.  If you have not checked out the RE Store or its counterparts in Seattle: Earthwise and Second Use they are an absolute must.  They are architectural salvage stores and in addition to flooring and appliances they carry second hand furniture, mirrors, and a bunch of other amazing things.  Their ever-changing inventory makes them worth checking out once every few months.  Some inventory is even posted online.

After my class yesterday I found this great counter-height kitchen cart that fits perfectly into our kitchen nook!

Anyhow, back to the class. It was put on by a local landscape design company. A RE Store employee collected lamps, vases, and other glass containers from their store and the landscaping company provided gravel, filter cloth, soil, and plants for our terrariums. 

If you are interested in making your own terrarium they are a great plant for an indoor space like an office.  They require little water, particularly the enclosed terrariums, and the plants that are generally used are low-light plants such as ferns. 

They actually should not be put in direct sunlight or near a window because they will bake with the sun shining directly through the glass.

I selected a hanging glass vase for my terrarium and a mixture of ferns, grass, and a fig ground cover.


Terrarium Instructions:

(1) Put a 1 inch layer of small gravel in the bottom of your container.
(2) Place a piece of black filter cloth over the gravel cut to the shape of your terrarium container.
(3) Add 2 inches of potting soil mixture.
(4) Add plants using a device such as a chopstick to help you dig a hole if the opening of your terrarium is not very large.
(5) Add a trinket or two as appropriate. (Note in my terrarium there is a small plastic pig rooting around in the soil.)
(6) Add your plants choosing different sizes, shapes, colors, and textures.

Projects in Progress: Vegetable Garden Part 2

We visited the Seattle Tilth edible plant sale yesterday and we got so excited by all the amazing greeny goodness that we bought a few too many plants...

Today we  had to put another bed in the ground as an emergency measure so the rest of our veggies could be planted.

We arrived at the sale near the end, and as we we were looking things over a Seattle Tilth representative got on the megaphone and announced that all of the plants were half price!!!  It was a bit of a mad dash but we maded it out alive. :)

So what did we get...


Kale
Rainbow Chard
Spicy Green and Gourmet Salad Mixes
Arugula
Raddichio
Deep Purple Broccoli
Dwarf Sweet Peas
Sprint Sweet Peas
Alpine and Honeyoye Strawberries
Various types of Sage
A Cranberry Bush
Softneck Garlic
Parsley
Marionberry Canebush
English and Lemon Thyme

If I haven't already convinced you to come over for dinner sometime this summer here are a few pictures.


All of the types of lettuces, arugula, thyme, parsley, strawberries, the dwarf peas and some basil seeds went into the original bed.  This bed has some of the best sun in the yard but unforunate placement next to the lineup of garbage, recycling, and yardwaste bins.  The plan is to hide the bins eventually with fencing but for now a trellis covered in peas will have to do.

Sprint peas with their makeshift trellis until a more solid system can be constructed. 


Rainbow chard seedlings.  I can already see the color of their stalks:
yellow, red, and orange.  I cannot wait to see them in full force!

 Alpine strawberries.  According to the tag that came with these, they do well potted and produce amazing large berries late into the fall.  Looking forward to warm off-the-vine strawberries in June, July, August...

Friday, March 19, 2010

Books I'm reading right now...in celebration of Spring!

The first book, Rain Gardens, has beautiful photographs of rain gardens and so much more.  It provides straightforward explanations of water management options. It features a lot of commercial spaces that seem a bit too large-scale for a residential space. Nevertheless,  I am convinced that we need some rain chains and I have been building a small rain garden into our most recent landscaping project. Even Tony was inspired and has proposed a green roof for the future garden shed!


I just started The Urban Homestead so I have only made it through the garden section.  So far, so good.  The book gets into some philosophy about the importance of being self-sufficient and spells out a fairly compelling argument for getting rid of your lawn entirely. I have most enjoyed the step-by-step instructions, which cover topics such as making fertilizer tea, building raised beds, constructing self-watering plant containers, and planting seed bombs. 

Growing Stuff also has some great photography.  Each section is an easily digested single page devoted to a topic, such as the basics of growing tomatos, growing carrots in an old pair of wellies, and growing herbs indoors. 

Friday, March 12, 2010

Office Space

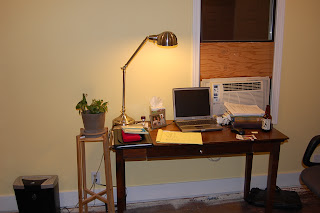
No, not the cult classic movie starring Jennifer Aniston and that guy who played Berger on Sex in the City! We finally have an office space, room, rather.   It looks a bit disheveled in these pictures but it is coming together and we are really happy to be making use of both rooms on the main floor. Also, the impact of the bright yellow paint seems to be softened by the distressed wood floors.


New office!


Tony's desk made by his dad.  He had to cut the legs a few inches to
get it in the room, but it looks great now that it is all set up!


My desk since my 1L year of law school. Note the window in the background with a wood board instead of a glass window pane.  That is on the project list.

 Bookcase handed down from my parents.
Look out for a post soon about some cool
bookends that I am making.

Wednesday, March 10, 2010

Projects In Progress: Vegetable Garden

We've been talking about a raised bed vegetable garden for a while now and last weekend we decided to make it happen.  "Why does it have to be raised?"  my sister asked when she was visiting.  "Well..." we said in unison "the dogs."  Also, the raised bed ensures that our veggies are grown in soil that doesn't have super toxic chemicals and heavy metals and we we won't break our backs tending the garden. 

When you consider all of that it really is irresistable...so we made the trip to Home Depot and purchased the wood and then it was onto City People's for some soil...


And then we put it all together....


Seeing something shiny and new in the otherwise run-down yard emphasizes how much work needs to be done. But we know we need to start small and work our way up to something amazing.  (Like our back yard neighbors...at least we have open fencing so we can be inspired by their masterpiece!)


Stay tuned for an update after we visit the Seattle Tilth Edible Plant Sale on March 20th.

Tuesday, March 2, 2010

Chard Lasagna

In my opinion a big part of making a house a home is meals.  I love the creative process of creating a meal.  The conversations around the dinner table (without a laptop in hand) are so much more meaningful.  Even doing the dishes can be a great way to clear your head.

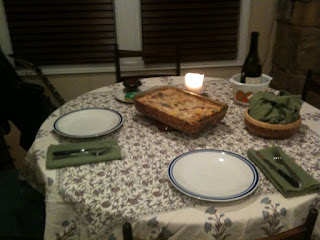
Initially, our dining table was crammed into an awkward corner in our kitchen but we have now set it up  in a corner of our living room as we were suffering without a usable dining space.  It looks pretty awkward right now as our living room has wall-to-wall carpet.  I'm envisioning hardwoods some day with a nice area rug to designate the "dining" space.  For now, we have room to sit and eat, and even have a few guests join us. 

Tonight I'm making one of our favorite recipes which I've adapted from an insert in our vegetable box a few years back.  I've included it below.  It's a little intimidating at first because it is so open but I've discovered this is my favorite kind of recipe...I've never made this with the exact same ingredients twice.


CHARD LASAGNA

Preheat Ovent to 350 F

Filling:
Make a tomato sauce (you can use a store bought jar in a pinch but making it yourself is more fun & delicious.  If using a store bought jar heat in a pan and jump to the meat section of the sauce.)

Sauce:
For sauce I like to use one can of diced unsalted tomatoes OR dice a few tomotoes and add them to the pot with some preheated olive oil, then add fresh herbs (basil, sage, thyme, & rosemary are good) and let it simmer. 


At the same time dice one large onion and saute in a large pan with salt & pepper to taste.


When the onions have gotten soft and slightly opaque add other veggies etc. (diced zuchhini, mushrooms, bell peppers, bits of chard, spinach, garlic, pine nuts ..whatever you like) and saute with the onions.  When everything has softened add to the sauce pot.  Add salt and pepper and other spices to taste.


If using meat, now is the time to brown your ground beef, turkey or diced sausage in that large pan that had onions, adding crumbled bacon is good too. 


"Noodles"
In the meantime slice some chard lengthwise to make lasgna noodle-like pieces.  Make one layer on the bottom of a lasgna pan and make enough slices for a top layer.  (You can also do a middle layer of chard with two levels of filling so cut what you'll need for whatever you decide to do.)


Once the meat has browned, add to the sauce pot and let simmer for a few minutes. 


Turn off the burner and set 1 1/2 to 2 cups of sauce aside.  Add the remaing sauce to a heat safe bowl with some binding ingredients like ricottta and cottage cheese, with grated parmesan.  This is the filling for the lasagna and the consistency should not be too watery.  You may want to add the sauce gradually to ensure it does not get to watery.

Add the filling to the pan over the top of the chard.  (If you would like multiple layers of chard layer accordingly) Lay the remaining chard pieces over the filling and cover with the remaing sauce that was set aside.  Top with grated parmesan (or any other cheese).

Bake at 350 Degrees Farenheit for 45 minutes.  10 minutes before the lasagna is finished you can add more cheese if you like an extra cheesy top.  While cooking open some wine so that it can aerate before dinner...drink a glass or two and open another bottle of wine as needed :)


ENJOY!!!